
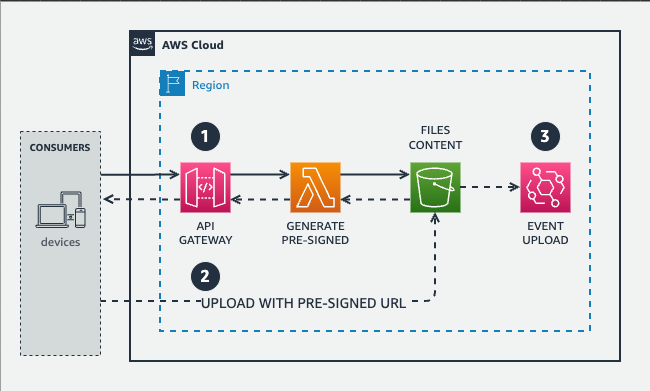
Every app that handles user uploads — profile pictures, documents, videos — faces the same problem: how do you let users upload directly to cloud storage without exposing your credentials? The answer is presigned URLs, and with Spring Boot they’re surprisingly easy to build.
What is a Presigned URL?
A presigned URL is a temporary, secure URL that grants limited access to a specific object in your S3 or R2 bucket. Think of it like a one-time guest pass — you control exactly what the holder can do, with which file, and for how long.
Without Presigned URL:
Frontend → POST /upload → Spring Boot → S3 Bucket
               ↑
     Server handles upload (bottleneck, expensive)

With Presigned URL:
Frontend → PUT presigned URL → S3 Bucket (direct upload)
      ↗
Spring Boot (just returns a signed URL)
Your Spring Boot server never touches the file data. It just issues a signed URL, and the frontend uploads directly to cloud storage.
Why Presigned URLs Matter
Uploading files through your backend seems straightforward, but it comes with hidden costs:
// ❌ The naive approach — don't do this
@PostMapping("/upload")
public ResponseEntity<?> upload(@RequestParam MultipartFile file) {
    s3Client.putObject(PutObjectRequest.builder()
        .bucket("my-bucket")
        .key(file.getOriginalFilename())
        .build(),
        RequestBody.fromBytes(file.getBytes())
    );
    // Your server just consumed CPU, memory, and bandwidth
    // for data that was always headed to S3 anyway
}
The Problems with Server-Side Uploads
| Problem | Impact |
|---|---|
| Bandwidth costs | Every byte passes through your server twice (in + out) |
| Server load | Large files tie up request threads and memory |
| Scaling complexity | You need bigger instances just to proxy file data |
| Timeout risks | Long uploads can hit reverse proxy / load balancer limits |
| Credential exposure | Your server holds permanent S3 keys |
What Presigned URLs Give You
| Benefit | How |
|---|---|
| Security | No permanent credentials ever reach the client |
| Performance | Direct upload bypasses your server entirely |
| Cost savings | Data transfer goes straight to S3/R2, not through your infra |
| Scalability | Your server handles only lightweight URL generation |
| Control | You set expiration time, file size limits, and allowed operations |
How Presigned URLs Work
The magic is in the signature. Your server uses its secret access key to cryptographically sign the request parameters. S3/R2 can verify that signature without ever seeing your secret key.
1. Frontend: "I need to upload profile-photo.jpg"
2. Spring Boot: GET /api/upload-url → generates presigned URL (valid 10 min, PUT only)
3. Spring Boot: Returns the signed URL to frontend
4. Frontend: PUT request directly to presigned URL with file bytes
5. S3/R2: Verifies signature, accepts upload
6. Done. File is in your bucket.
The URL itself encodes the permissions:
https://my-bucket.s3.amazonaws.com/uploads/profile-photo.jpg
  ?X-Amz-Algorithm=AWS4-HMAC-SHA256
  &X-Amz-Credential=AKIA.../20260610/us-east-1/s3/aws4_request
  &X-Amz-Date=20260610T120000Z
  &X-Amz-Expires=600
  &X-Amz-Signature=9f3a...b2d1
S3 vs R2: What’s the Difference?
Cloudflare R2 was built as an S3-compatible alternative with one killer feature: no egress fees.
| Feature | AWS S3 | Cloudflare R2 |
|---|---|---|
| API Compatibility | Native S3 API | S3-compatible API |
| Egress Cost | $0.09/GB | $0 (free) |
| Storage Cost | ~$0.023/GB | $0.015/GB |
| Presigned URL Support | Native | Full support via S3 SDK |
| Global Network | Regional buckets | Distributed by default |
| Operations Cost | Class A/B charges | No charge for Class A, $0.36/million for Class B |
The best part: R2 uses the same S3 API. The Java code you write for S3 presigned URLs works on R2 with just an endpoint change.
Setting Up the AWS SDK for Java
Add the AWS SDK dependency to your Spring Boot project. You only need the S3 module — nothing else.
Maven (pom.xml):
<dependency>
    <groupId>software.amazon.awssdk</groupId>
    <artifactId>s3</artifactId>
    <version>2.30.38</version>
</dependency>
Gradle (build.gradle):
dependencies {
    implementation 'software.amazon.awssdk:s3:2.30.38'
}
Spring Boot: S3 Presigned Upload URL API
First, configure the S3 presigner as a Spring bean. This gets injected wherever you need it.
Configuration
// application.yml
aws:
  s3:
    region: us-east-1
    bucket: my-app-uploads
    access-key-id: ${AWS_ACCESS_KEY_ID}
    secret-access-key: ${AWS_SECRET_ACCESS_KEY}
// S3Config.java
package com.example.config;
import org.springframework.beans.factory.annotation.Value;
import org.springframework.context.annotation.Bean;
import org.springframework.context.annotation.Configuration;
import software.amazon.awssdk.auth.credentials.AwsBasicCredentials;
import software.amazon.awssdk.auth.credentials.StaticCredentialsProvider;
import software.amazon.awssdk.regions.Region;
import software.amazon.awssdk.services.s3.presigner.S3Presigner;
@Configuration
public class S3Config {
@Value("${aws.s3.region}")
private String region;
@Value("${aws.s3.access-key-id}")
private String accessKeyId;
@Value("${aws.s3.secret-access-key}")
private String secretAccessKey;
@Bean
public S3Presigner s3Presigner() {
return S3Presigner.builder()
.region(Region.of(region))
.credentialsProvider(StaticCredentialsProvider.create(
AwsBasicCredentials.create(accessKeyId, secretAccessKey)
))
.build();
}
}The Presigned URL Service
// PresignedUrlService.java
package com.example.service;

import org.springframework.beans.factory.annotation.Value;
import org.springframework.stereotype.Service;
import software.amazon.awssdk.services.s3.model.PutObjectRequest;
import software.amazon.awssdk.services.s3.presigner.S3Presigner;
import software.amazon.awssdk.services.s3.presigner.model.PutObjectPresignRequest;

import java.time.Duration;
import java.util.UUID;

@Service
public class PresignedUrlService {

    private final S3Presigner presigner;
    private final String bucket;

    public PresignedUrlService(
        S3Presigner presigner,
        @Value("${aws.s3.bucket}") String bucket
    ) {
        this.presigner = presigner;
        this.bucket = bucket;
    }

    public PresignedUrlResponse generateUploadUrl(
        String fileName,
        String contentType,
        String folder
    ) {
        String key = "%s/%s-%s".formatted(
            folder,
            System.currentTimeMillis(),
            sanitizeFileName(fileName)
        );

        PutObjectRequest objectRequest = PutObjectRequest.builder()
            .bucket(bucket)
            .key(key)
            .contentType(contentType)
            .build();

        PutObjectPresignRequest presignRequest = PutObjectPresignRequest.builder()
            .putObjectRequest(objectRequest)
            .signatureDuration(Duration.ofMinutes(10))
            .build();

        String url = presigner.presignPutObject(presignRequest).url().toString();

        return new PresignedUrlResponse(url, key);
    }

    private String sanitizeFileName(String fileName) {
        return fileName.replaceAll("[^a-zA-Z0-9._-]", "_");
    }
}
DTO
// PresignedUrlResponse.java
package com.example.dto;

public record PresignedUrlResponse(
    String uploadUrl,
    String key
) {}

// UploadUrlRequest.java
package com.example.dto;

public record UploadUrlRequest(
    String fileName,
    String contentType,
    String folder
) {}
The REST Controller
// UploadController.java
package com.example.controller;

import com.example.dto.UploadUrlRequest;
import com.example.dto.PresignedUrlResponse;
import com.example.service.PresignedUrlService;
import org.springframework.http.ResponseEntity;
import org.springframework.web.bind.annotation.*;

@RestController
@RequestMapping("/api")
public class UploadController {

    private final PresignedUrlService presignedUrlService;

    public UploadController(PresignedUrlService presignedUrlService) {
        this.presignedUrlService = presignedUrlService;
    }

    @PostMapping("/upload-url")
    public ResponseEntity<PresignedUrlResponse> getUploadUrl(
        @RequestBody UploadUrlRequest request
    ) {
        PresignedUrlResponse response = presignedUrlService.generateUploadUrl(
            request.fileName(),
            request.contentType(),
            request.folder()
        );
        return ResponseEntity.ok(response);
    }
}
That’s it. Your frontend now hits POST /api/upload-url with a JSON body, gets back a presigned URL, and uploads directly to S3.
Spring Boot: R2 Presigned Upload URL API
For Cloudflare R2, you only need to change the presigner configuration. The service and controller stay identical.
R2 Configuration
// R2Config.java
package com.example.config;

import org.springframework.beans.factory.annotation.Value;
import org.springframework.context.annotation.Bean;
import org.springframework.context.annotation.Configuration;
import software.amazon.awssdk.auth.credentials.AwsBasicCredentials;
import software.amazon.awssdk.auth.credentials.StaticCredentialsProvider;
import software.amazon.awssdk.regions.Region;
import software.amazon.awssdk.services.s3.presigner.S3Presigner;

import java.net.URI;

@Configuration
public class R2Config {

    @Value("${cloudflare.r2.account-id}")
    private String accountId;

    @Value("${cloudflare.r2.access-key-id}")
    private String accessKeyId;

    @Value("${cloudflare.r2.secret-access-key}")
    private String secretAccessKey;

    @Bean
    public S3Presigner r2Presigner() {
        return S3Presigner.builder()
            .region(Region.of("auto"))
            .endpointOverride(URI.create(
                "https://%s.r2.cloudflarestorage.com".formatted(accountId)
            ))
            .credentialsProvider(StaticCredentialsProvider.create(
                AwsBasicCredentials.create(accessKeyId, secretAccessKey)
            ))
            .build();
    }
}
# application.yml
cloudflare:
r2:
account-id: ${R2_ACCOUNT_ID}
bucket: my-r2-bucket
access-key-id: ${R2_ACCESS_KEY_ID}
secret-access-key: ${R2_SECRET_ACCESS_KEY}The PresignedUrlService is identical — just inject the R2 presigner bean and point the bucket name at your R2 bucket. No other code changes needed.
What the Frontend Does
Once Spring Boot hands the frontend a presigned URL, uploading is a straightforward HTTP PUT:
async function uploadFile(file) {
  // Step 1: Get presigned URL from your Spring Boot API
  const response = await fetch("/api/upload-url", {
    method: "POST",
    headers: { "Content-Type": "application/json" },
    body: JSON.stringify({
      fileName: file.name,
      contentType: file.type,
      folder: "avatars",
    }),
  });
  const { uploadUrl, key } = await response.json();

  // Step 2: Upload directly to S3/R2 (not through your server)
  const uploadResponse = await fetch(uploadUrl, {
    method: "PUT",
    body: file,
    headers: { "Content-Type": file.type },
  });

  if (!uploadResponse.ok) {
    throw new Error("Upload failed");
  }

  // Step 3: Optionally save `key` to your backend for future reference
  return { key, publicUrl: `https://cdn.yourdomain.com/${key}` };
}
Presigned URLs for Downloads Too
The pattern works both ways. Expose an endpoint that generates a download URL for private files:
// Inside PresignedUrlService.java
import software.amazon.awssdk.services.s3.model.GetObjectRequest;
import software.amazon.awssdk.services.s3.presigner.model.GetObjectPresignRequest;

public String generateDownloadUrl(String key, Duration expiration) {
    GetObjectRequest objectRequest = GetObjectRequest.builder()
        .bucket(bucket)
        .key(key)
        .build();

    GetObjectPresignRequest presignRequest = GetObjectPresignRequest.builder()
        .getObjectRequest(objectRequest)
        .signatureDuration(expiration)
        .build();

    return presigner.presignGetObject(presignRequest).url().toString();
}
// DownloadController.java
@GetMapping("/api/download-url/{fileId}")
public ResponseEntity<Map<String, String>> getDownloadUrl(@PathVariable String fileId) {
// Fetch the actual S3 key from your database
String key = fileRepository.getKeyByFileId(fileId);
// Optional: verify the user has access to this file
if (!hasAccess(fileId)) {
return ResponseEntity.status(403).build();
}
String url = presignedUrlService.generateDownloadUrl(key, Duration.ofMinutes(5));
return ResponseEntity.ok(Map.of("downloadUrl", url));
}Security Best Practices
1. Set the Shortest Practical Expiration
// Upload URLs: shorter is better — the client uses them immediately
private static final Duration UPLOAD_EXPIRY = Duration.ofMinutes(10);

// Download URLs: depends on use case
private static final Duration DOWNLOAD_EXPIRY = Duration.ofMinutes(5);
private static final Duration SHARE_LINK_EXPIRY = Duration.ofHours(24);
2. Always Specify ContentType
Without it, a malicious file uploaded as image/png could be stored as binary/octet-stream and later executed by a browser. Bind the content type to the presigned URL so S3 enforces it:
// ✅ Good: ContentType is explicit
PutObjectRequest.builder()
    .bucket(bucket)
    .key(key)
    .contentType("image/png")

// ❌ Bad: Missing ContentType — undefined behavior
PutObjectRequest.builder()
    .bucket(bucket)
    .key(key)
3. Validate Inputs on the Controller
The presigned URL locks in the content type, but the frontend still controls what it sends you. Validate before generating:
@PostMapping("/upload-url")
public ResponseEntity<?> getUploadUrl(@RequestBody UploadUrlRequest request) {
    // Whitelist allowed content types
    Set<String> allowedTypes = Set.of(
        "image/jpeg", "image/png", "image/webp", "application/pdf"
    );

    if (!allowedTypes.contains(request.contentType())) {
        return ResponseEntity.badRequest()
            .body(Map.of("error", "Unsupported file type"));
    }

    // Rate limit per user
    if (rateLimiter.isExceeded(getCurrentUserId())) {
        return ResponseEntity.status(429)
            .body(Map.of("error", "Too many requests"));
    }

    PresignedUrlResponse response = presignedUrlService.generateUploadUrl(
        request.fileName(), request.contentType(), request.folder()
    );
    return ResponseEntity.ok(response);
}
4. Scope Keys by User or Tenant
Prevent users from guessing or overwriting each other’s files:
// ✅ User-scoped key
String key = "users/%s/%s/%s-%s".formatted(
    userId, folder, System.currentTimeMillis(), fileName
);

// ❌ Global flat namespace — anyone can overwrite
String key = "%s/%s".formatted(folder, fileName);
5. Use POST Policies for Stricter Controls
For fine-grained control (file size limits enforced by S3 itself), use S3Presigner’s post policy support:
import software.amazon.awssdk.services.s3.presigner.model.PresignedPostRequest;

public PresignedPost generateUploadPost(String key, String contentType) {
    return presigner.presignPost(PresignedPostRequest.builder()
        .putObjectRequest(PutObjectRequest.builder()
            .bucket(bucket)
            .key(key)
            .contentType(contentType)
            .build())
        .signatureDuration(Duration.ofMinutes(10))
        .build()
    );
}
This returns a URL and form fields — the frontend posts a multipart form instead of a raw PUT.
Common Pitfalls and How to Avoid Them
Pitfall 1: CORS Errors
S3 and R2 buckets need explicit CORS configuration for browser uploads. Configure this in the S3 console under Bucket → Permissions → CORS configuration, or via the R2 dashboard under Bucket Settings → CORS:
[
  {
    "AllowedOrigins": ["https://yourdomain.com"],
    "AllowedMethods": ["PUT", "GET", "HEAD", "POST"],
    "AllowedHeaders": ["Content-Type"],
    "ExposeHeaders": ["ETag"],
    "MaxAgeSeconds": 3600
  }
]
Pitfall 2: Expired URLs on Slow Connections
S3 validates the signature only at request start — once the PUT begins, it completes regardless of expiration. But if the connection drops and the frontend retries, it needs a fresh URL. Handle this gracefully:
// Frontend: retry with a fresh URL on failure
async function uploadWithRetry(file, maxRetries = 3) {
  for (let attempt = 0; attempt < maxRetries; attempt++) {
    try {
      const { uploadUrl } = await fetch("/api/upload-url", {
        method: "POST",
        headers: { "Content-Type": "application/json" },
        body: JSON.stringify({
          fileName: file.name,
          contentType: file.type,
          folder: "uploads",
        }),
      }).then((r) => r.json());

      await fetch(uploadUrl, { method: "PUT", body: file });
      return;
    } catch (err) {
      if (attempt === maxRetries - 1) throw err;
    }
  }
}
Pitfall 3: Large Files Without Multipart Upload
For files over 100MB, presigned URLs still work — generate one per part. Spring Boot handles this cleanly:
import software.amazon.awssdk.services.s3.model.CreateMultipartUploadRequest;
import software.amazon.awssdk.services.s3.model.UploadPartRequest;

public MultipartUploadResponse initiateMultipartUpload(
    String key, String contentType, int totalParts
) {
    CreateMultipartUploadRequest createRequest = CreateMultipartUploadRequest.builder()
        .bucket(bucket)
        .key(key)
        .contentType(contentType)
        .build();

    String uploadId = s3Client.createMultipartUpload(createRequest).uploadId();

    List<String> partUrls = new ArrayList<>();
    for (int i = 1; i <= totalParts; i++) {
        UploadPartRequest partRequest = UploadPartRequest.builder()
            .bucket(bucket)
            .key(key)
            .uploadId(uploadId)
            .partNumber(i)
            .build();

        String partUrl = presigner.presignUploadPart(PutObjectPresignRequest.builder()
            .putObjectRequest(PutObjectRequest.builder()
                .bucket(bucket)
                .key(key)
                .build())
            .signatureDuration(Duration.ofHours(1))
            .build()
        ).url().toString();

        partUrls.add(partUrl);
    }

    return new MultipartUploadResponse(uploadId, partUrls);
}
Which Should You Choose: S3 or R2?
Choose S3 When
- You’re deep in the AWS ecosystem (Lambda, CloudFront, IAM)
- You need advanced features like S3 Object Lambda, S3 Select, or replication rules
- Regional data residency requirements matter and AWS has a region near you
Choose R2 When
- Egress costs are a concern (serving files to users frequently)
- You want simpler pricing without operation charges
- You’re already using Cloudflare for DNS/CDN
- You want globally distributed storage without cross-region replication complexity
- You’re building bandwidth-heavy applications (video streaming, large file sharing)
Many teams use both: S3 as the primary store with R2 as a CDN-adjacent cache layer to eliminate egress costs on frequently accessed files.
The Bottom Line
Presigned URLs let you offload file uploads from your Spring Boot server while keeping full control. Your server generates a time-limited, scoped URL, and the frontend uploads directly to S3 or R2 — your infrastructure never touches the file bytes.
The key takeaways:
- Use presigned URLs for any user-facing file uploads. Don’t proxy through your server.
- R2 works with the same AWS SDK — just change the endpoint and region. Same code, zero egress fees.
- Set short expirations and always specify
ContentType. - Scope keys by user ID to prevent collisions and unauthorized access.
- Configure CORS on your bucket before testing from a browser.
- Use POST policies when you need file size limits enforced server-side.
Wire this up once with Spring Boot, and you’ll never go back to proxying uploads through your backend.
Pro Tip: Combine presigned uploads with a CDN like CloudFront (for S3) or Cloudflare’s built-in CDN (for R2). Once a file lands in your bucket, serve it through the CDN’s cache for sub-10ms delivery worldwide — with R2, you pay nothing for the bandwidth.
Member discussion
0 commentsStart the conversation
Become a member of >hacksubset_ to start commenting.
Already a member? Sign in